- OPMAATZAGEN.nl
- Do it yourself
- DIY Projects
DIY paneling for the toddler room, by Marianne
DIY paneling for the toddler room, by Marianne

Create this project yourself with sheet material cut to size by OPMAATZAGEN.nl!

Marianne designed this entirely themselves: from cutlist to finish. Get inspired by the materials used below — and then think about how you would tackle it. We make sure the wood is accurate to the millimetre; the rest is up to you.
Introduction
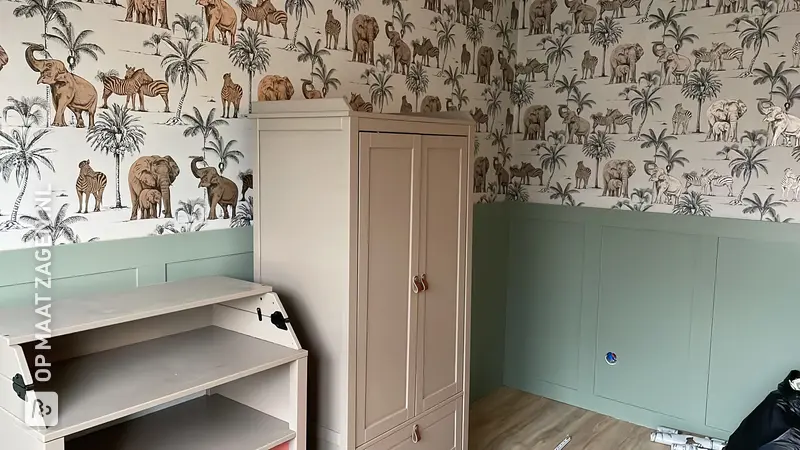
For our daughter's new toddler room, I really wanted to create a real girl's room: soft, atmospheric, and with just a few extra details. I quickly came up with the idea of making classic wainscoting out of MDF. It immediately gives the room more character and is actually surprisingly simple to make yourself.
I had done various DIY projects before, but with wainscoting, calculating the panel divisions accurately is particularly important. I ordered the MDF cut to size from OPMAATZAGEN.nl. As a result, all the strips arrived neatly cut to size, and we could start assembling almost immediately.
For the wainscoting, I chose 12 mm thick MDF with 10 cm wide strips. The vertical planks are 90 cm high and mounted on the skirting board. After installation, I painted everything in the same soft pink color (Blush by Little Greene), making the MDF slats and the existing wall blend beautifully into one.
As an extra detail, I placed small wooden balls at the top. It is precisely that little detail that, for me, completes the paneling and gives the toddler's room a playful look.
Check my account @mariannevanhelden_ for links and a step-by-step plan, visible in the reels.
Job description
The idea
Before I ordered the MDF, I first carefully measured all the walls and determined how many sections I wanted to make.
The longest wall is 340 cm wide. Here, I wanted to create five roughly equal sections using 10 cm wide MDF strips. For five sections, you need six vertical strips: one on both outer sides and four in between.
The calculation was:
- 6 vertical strips × 10 cm = 60 cm MDF
- 340 cm – 60 cm = 280 cm available space
- 280 cm ÷ 5 sections = 56 cm per section
So I knew that the spaces had to be about 56 cm wide.
The wall opposite is shorter and approximately 230 cm wide. Here, I have continued the same look but adjusted the layout to the width of the wall.
We have a radiator under the window. As a result, the paneling could not continue in exactly the same way there, so we finished cutting the MDF strips to size on site.
My tip: calculate each wall separately. Don't necessarily try to maintain exactly the same section width everywhere. It looks better if the sections on each wall are neatly and symmetrically distributed.
What did I order?
For the wainscoting, I chose 12 mm thick MDF from OPMAATZAGEN.nl. The strips are 10 cm wide.
- For the long wall of 340 cm, I used 2 horizontal strips of 340 cm and 6 vertical strips of 90 cm.
- For the wall of approximately 230 cm, I used vertical strips of 90 cm and horizontal strips across the width of the wall.
- At the window, we deliberately ordered a number of parts slightly larger so that we could make them fit exactly around the radiator at home.
What tools do you need?
- Tape measure
- Pencil
- Spirit level
- Saw for any minor adjustments
- Caulking gun
- Paint roller and brush
- Sandpaper
What do you need for the assembly?
- 12 mm thick MDF, cut to size
- Mounting kit
- Acrylic sealant
- Wooden balls for the finishing
What do you need for the finishing touches?
- Little Greene Eggshell in the color Blush
- Paint roller
- Brush
- Acrylic sealant
- Wooden trim balls
Final result and conclusion
The end result turned out exactly as I envisioned: a relatively simple DIY that changes the entire look of the room.
Instagram: @mariannevanhelden_ and check the Toddler Room highlight for more tips and information. Additionally, you will find a series on my page about the Toddler Room where I take you through it step by step.
Tip! Also check out our handy DIY tips!
Step by step guide
Preparation
Step 1: Measure the walls and create the section division. First, accurately measure each wall and determine how many sections you like. Take the width of the MDF strips into account when doing this. Make this calculation before ordering the MDF. This way, you can have the majority cut to size immediately and will have much less sawing to do at home.
Montage
Step 2: Install the MDF strips. We left the existing skirting boards in place. Above them, we installed the bottom horizontal MDF strip. Next, we placed the vertical strips, and finally, the top horizontal strips. We attached the MDF strips directly to the wall using mounting adhesive. During installation, carefully check that the horizontal sections are aligned straight. Even a slight deviation will be visible in the overall panel division later on.
Finish
Step 3: Neatly seal all edges. Once all the MDF strips were in place, we finished the edges and small seams with acrylic sealant. Take your time with this. By neatly sealing the joints between the MDF and the wall, the paneling will look much more like a single unit after painting. Then, let the sealant dry thoroughly before painting.
Step 4: Paint the wainscoting. We only painted the MDF after everything had been attached to the wall and sealed. For the finish, I chose Little Greene Eggshell in the color Blush. Both the MDF strips and the lower part of the wall were painted the same color. I applied two coats of paint for nice, even coverage. Because everything is painted in the same shade, the individual MDF strips visually blend into the whole, creating that true classic wainscoting effect.
Step 5: Add the wooden balls. Finally, I wanted to add a playful detail that suits a toddler's room well. That is why I placed wooden balls along the top of the wainscoting. I ordered the balls online and attached them with mounting adhesive. At the ends, I sawed off a small piece of the balls so that the row would finish nice and flush against the adjoining wall. In the corners, you can miter them for a more aesthetically pleasing look. A small detail, but for me, it completes the wainscoting!
What's in your project?
- Included: Complete kit incl. fittings and instructions
- Included: Design via 3D configurator
- Included: Fully made to your own measurements
- Not included: Edge finish of your choice
- Not included: Round or curved shapes also possible
- Not included: Each part available in a different wood type
Made-to-measure self-build kit
Prefer a complete kit? Design your furniture in our 3D configurator and receive all parts, fittings and instructions in one package.
- Not included: Complete kit incl. fittings and instructions
- Not included: Design via 3D configurator
- Included: Fully made to your own measurements
- Included: Edge finish of your choice
- Included: Round or curved shapes also possible
- Included: Each part available in a different wood type
Inspiration cutlist
Want to make this DIY project? Check out Marianne's saw list and complete your order easily.
Materials used

Total price
€ 147,09
Add Marianne's cutlist straight to your cart
My experience with OPMAATZAGEN.nl
Order
Delivery
General experience